常见的设计模式的简单总结和简单实现,为以后做个参考
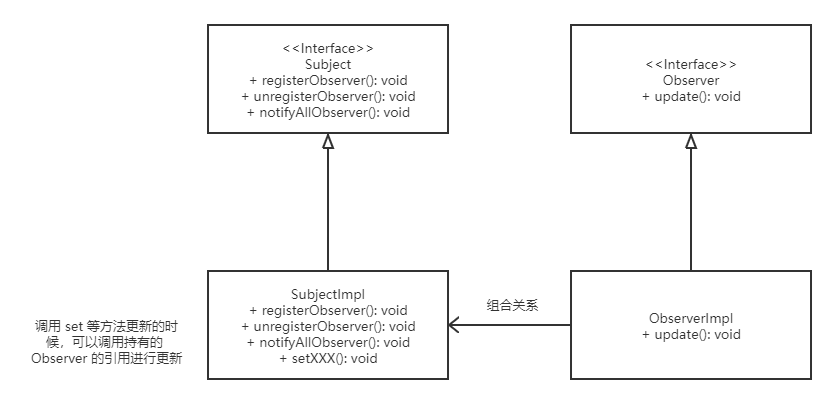
观察者模式 观察者模式简单实现 只需要让 subject 在更新的时候 通知 观察者,基本结构如下
1 2 3 4 5 6 7 8 9 10 11 12 13 14 15 16 17 18 19 20 21 22 23 24 25 26 27 28 29 30 31 32 33 34 35 36 37 38 39 40 41 42 43 44 45 46 47 48 49 50 51 52 53 54 55 56 57 58 59 60 61 62 63 64 65 66 67 68 69 70 public interface Observer void update () } public interface Subject void registerObserver (Observer ob) void unregisterObserver (Observer ob) void notifyAllObserver () } public class SubjectImpl implements Subject List<Observer> obs; public SubjectImpl () this .obs = new ArrayList<>(); } @Override public void registerObserver (Observer ob) for (Observer registered : obs) { if (ob == registered) return ; } this .obs.add(ob); } @Override public void unregisterObserver (Observer ob) this .obs.remove(ob); } public void setXXX () this .notifyAllObserver(); } @Override public void notifyAllObserver () for (Observer registered : obs) { registered.update(); } } } public class ObserverImpl implements Observer @Override public void update () System.out.println("update" ); } } public class Main public static void main (String[] args) Subject s = new SubjectImpl(); for (int i = 0 ; i < 10 ; i++) { s.registerObserver(new ObserverImpl()); } s.notifyAllObserver(); } }
java 内置的观察者模式 Observable (Subject) 类与 Observor 接口
This class and the Observer interface have been deprecated. The event model supported by Observer and Observable is quite limited, the order of notifications delivered by Observable is unspecified, and state changes are not in one-for-one correspondence with notifications. For a richer event model, consider using the java.beans package. For reliable and ordered messaging among threads, consider using one of the concurrent data structures in the java.util.concurrent package. For reactive streams style programming, see the java.util.concurrent.Flow API.
1
2
3
4
5
6
7
8
9
10
11
12
13
14
15
16
17
18
19
20
21
22
23
24
25
26
27
28
29
30
31
public class ObserverImpl implements Observer @Override public void update () System.out.println("update" ); } } public class SubjectImplUseJDK extends Observable public Object msg; public void setMsg (Object msg) this .msg = msg; setChanged(); notifyObservers(msg); } } public class Main public static void main (String[] args) SubjectImplUseJDK b = new SubjectImplUseJDK(); for (int i = 0 ; i < 10 ; i++) { b.addObserver(new ObserverImplUseJDK()); } b.setMsg("test" ); } }
装饰器 装饰器可以方便的扩展原来的类不具备的方法。
符合 开闭原则 (对扩展开放,对修改关闭)
简单例子 通过子类持有基类的引用,通过构造器对原始的对象进行运行时增强。
1
2
3
4
5
6
7
8
9
10
11
12
13
14
15
16
17
18
19
20
21
22
23
24
25
26
27
28
29
30
31
32
33
34
35
36
37
38
39
40
41
42
43
44
45
46
47
public abstract class Base public abstract void base () } public class OneImpl extends Base private Base base; public OneImpl (Base base) this .base = base; } @Override public void base () base.base(); System.out.println("one" ); } } public abstract class TwoAbstract extends Base public abstract void anotherAbstract () } public class TwoImpl extends TwoAbstract private Base base; public TwoImpl (Base base) this .base = base; } @Override public void base () base.base(); System.out.println("Two" ); } @Override public void anotherAbstract () System.out.println("another" ); } }
java 中的例子 java i/o 类
InputStream 及其子类,可以使用装饰器增强方法
一个 new BufferedInputStream(new FileInputStream(file));
1 2 3 4 5 6 7 8 9 10 11 12 13 14 15 16 17 18 19 20 21 22 23 24 25 26 27 28 29 30 31 32 33 34 35 36 37 38 39 40 41 42 43 44 45 46 47 48 49 50 51 52 53 54 55 56 57 58 59 60 61 62 63 64 65 66 67 68 69 70 71 72 73 74 75 76 public abstract class InputStream implements Closeable public abstract int read () throws IOException public int read (byte b[], int off, int len) throws IOException Objects.checkFromIndexSize(off, len, b.length); if (len == 0 ) { return 0 ; } int c = read(); if (c == -1 ) { return -1 ; } b[off] = (byte )c; int i = 1 ; try { for (; i < len ; i++) { c = read(); if (c == -1 ) { break ; } b[off + i] = (byte )c; } } catch (IOException ee) { } return i; } } public class BufferedInputStream extends FilterInputStream public BufferedInputStream (InputStream in) this (in, DEFAULT_BUFFER_SIZE); } public synchronized int read () throws IOException if (pos >= count) { fill(); if (pos >= count) return -1 ; } return getBufIfOpen()[pos++] & 0xff ; } private void fill () throws IOException count = pos; int n = getInIfOpen().read(buffer, pos, buffer.length - pos); if (n > 0 ) count = n + pos; } } public class FileInputStream extends InputStream public int read () throws IOException return read0(); } private native int read0 () throws IOException }
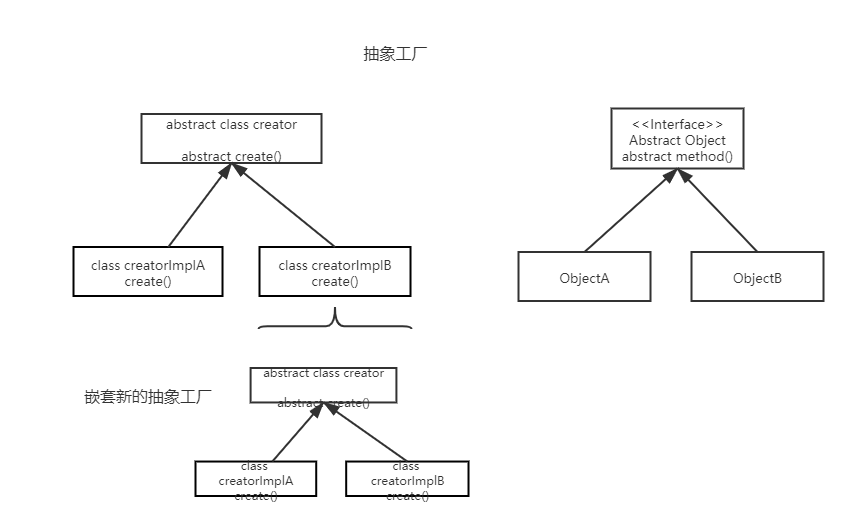
工厂模式 抽象对象的新建过程
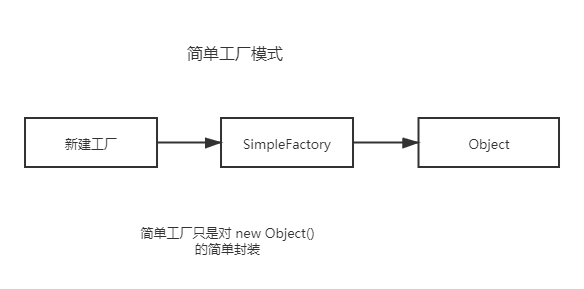
简单工厂 简单工厂可以看做是对 new Object() 的简单抽象
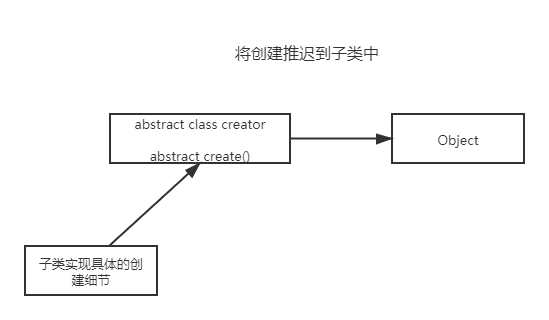
工厂方法 上面是一个简单的例子,子类将会实现 abstract 的抽象工厂方法,将创建细节在子类中实现,提供一个抽象的工厂方法。
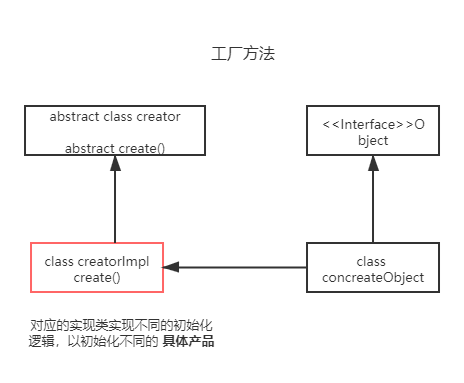
进一步,可以将其分为两类
Object (产品对应的接口)
concreateObject(对应的具体产品实现类)
abstract creator(抽象的工厂方法)
creatorImpl(实现对 concreateObject 的初始化)
抽象工厂 依赖倒置原则 依赖抽象,不能依赖具体类。
因此,抽象工厂针对产品,也是对产品的抽象进行维护和管理,不能对具体产品进行管理,所以需要抽象一下两个部分
抽象工厂
抽象产品(具体的产品依赖这个 base 的抽象产品)
实现 针对产品和工厂进行抽象 甚至可以嵌套抽象工厂 进一步抽象 product 的初始化流程。
这样 client 只需要针对参数等情况 分发到不同的 factory 即可
单例模式 全局共享一个变量
java 的单例模式
懒汉式
由于 类加载 是线程安全的,所知直接放到 中初始化
1
2
3
4
5
6
7
8
9
10
public class LazySingleton private static final Object singleton = new Object(); private LazySingleton () public static Object getSingleton () return singleton; } }
饿汉式
需要的时候再创建,为了保障多线程安全,创建的时候加锁
1
2
3
4
5
6
7
8
9
10
11
12
13
14
public class HungrySingleton private static final Object singleton; private HungrySingleton () public static Object getSingleton () synchronized (HungrySingleton.class) { if (singleton == null ) { singleton = new NeedSingletonClass(); } return singleton; } } }
双重校验锁
双重校验锁,初始化的时候使用 synchronized 保障线程安全,同时使用 volatile 保障指令不被重排序。
1
2
3
4
5
6
7
8
9
10
11
12
13
14
15
16
17
18
19
20
21
public class DoubleCheckSingleton private static volatile Object singleton; public static Object getSingleton () if (singleton == null ) { synchronized (DoubleCheckSingleton.class) { if (singleton == null ) { singleton = new Object(); } } } return singleton; } }
静态内部类
1 2 3 4 5 6 7 8 9 10 11 12 13 14 15 16 17 public class StaticClassSingleton private StaticClassSingleton () private static class InnerStaticClass public static NeedSingletonClass singletonClass = new NeedSingletonClass(); } public static final NeedSingletonClass getInstance () return InnerStaticClass.singletonClass; } }
命令模式 命令模式是为了封装不同的操作的不同 api 做的
如线程池等的实现、工作队列等也是跟命令模式相关
1
2
3
4
5
6
7
8
9
10
11
12
13
14
15
16
17
18
19
20
21
22
23
24
25
26
27
28
29
30
31
32
33
34
35
36
37
38
39
40
41
42
public class Client private CommandManager manager; public Client (CommandManager manager) this .manager = manager; } public void execute (int id, Object args) this .manager.execute(id, args); } } public interface Command void execute (Object args) } public class CommandExecutor void up () System.out.println("executor up !" ); } } public class CommandManager private Command[] commands; public CommandManager () this .commands = new Command[1 ]; this .commands[0 ] = new CommandImpl(new CommandExecutor()); } public void execute (int commandID, Object args) this .commands[commandID].execute(args); } }
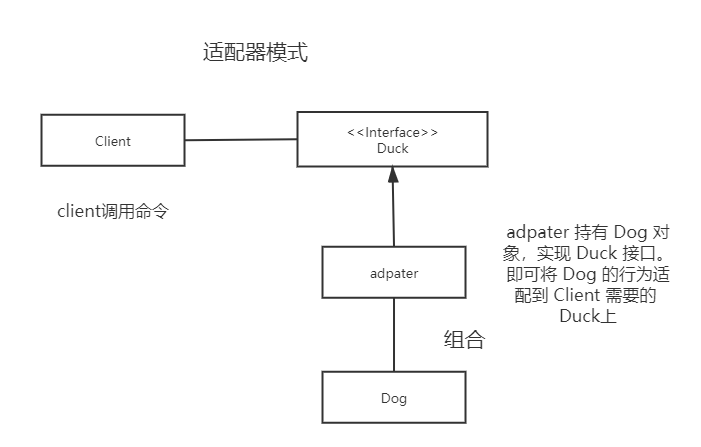
适配器模式 为了适配两种不同的方法的对象,让一种能够适应另一种添加的类
接口适配:实现对应的接口,通过组合的方式实现适配。
类适配:通过组合继承(java 不可能)
1 2 3 4 5 6 7 8 9 10 11 12 13 14 15 16 17 18 19 20 21 22 23 24 25 26 27 28 public interface Duck void spark () } public class Dog public void bark () System.out.println("!!!!!!!!" ); } } public class DuckAdapter implements Duck private Dog dog; public DuckAdapter (Dog dog) this .dog = dog; } @Override public void spark () this .dog.bark(); } }
外观模式 外观模式是一个向外暴露简单接口,对内进行包装的设计模式。用于封装复杂的逻辑,以减少对象之间的依赖。
最少知识原则: 减少对象间的交互,因此只应该调用以下范围的方法。
对象本身
方法参数传递的对象
此方法创建或实例化的对象
对象的任何组件
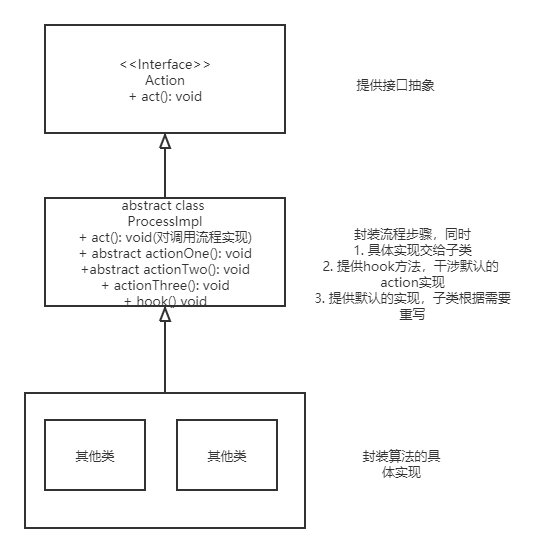
模板方法 模板方法用于封装统一的抽象步骤。通过在父类中定义算法的运行流程,提供算法的默认实现并交给不同的子类进行重载完成。
1
2
3
4
5
6
7
8
9
10
11
12
13
14
15
16
17
18
19
20
21
22
23
24
25
26
27
28
29
30
31
32
33
34
35
36
37
38
39
40
41
42
43
44
45
46
47
48
49
50
public interface Action void act () } public abstract class AbstractProcess implements Action public void actionOne () System.out.println("One" ); } public void actionTwo () System.out.println("Two" ); } public abstract void actionThree () public abstract void hook () @Override public void act () actionOne(); actionTwo(); actionThree(); hook(); } } public class ProcessImpl extends AbstractProcess @Override public void actionThree () System.out.println("process" ); } @Override public void hook () System.out.println("hook" ); } }
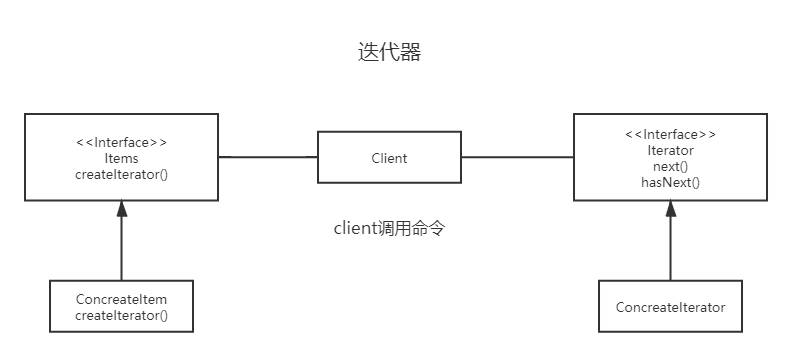
迭代器模式 迭代器模式用来提供统一的访问元素的接口,可以不用知道元素存储的具体细节访问。
通过 iterator 暴露统一的 遍历 接口。客户端通过保存所有数据的 Items 实现类创建对应的 iterator 完成数据的遍历操作。
单一责任:一个类应该只有一个引起变化的原因,所以需要把 Items 与 Iterator 分开实现。
使用一个数值来表明现在访问到的位置
1
2
3
4
5
6
7
8
9
10
11
12
13
14
15
16
17
18
19
20
21
22
23
24
25
26
27
28
29
30
31
32
33
34
package iterator;public interface BaseIterator boolean hasNext () Object next () ; } package iterator;public class ArrayIterator implements BaseIterator private int index; private int [] nums; public ArrayIterator (int [] nums) this .nums = nums; this .index = 0 ; } @Override public boolean hasNext () return this .index < nums.length; } @Override public Object next () return this .nums[this .index++]; } }
在树状结构中进行迭代的方式 相当于组合迭代器,问如果在 [1,[2,3,[2,34],3]] 这种中间实现 iterator 该如何处理。
例题- 扁平化嵌套列表迭代器
空数组即 [[]] 返回 null 的解法 使用递归的思想,在 iterator 中保存每次遍历的 iterator
这样在遇到深层次的嵌套的时候,会在每一个 iterator 中保存 下一层次的引用,最后得到结果
1
2
3
4
5
6
7
8
9
10
11
12
13
14
15
16
17
18
19
20
21
22
23
24
25
26
27
28
29
30
31
32
33
34
35
36
37
38
39
40
41
42
43
44
45
46
47
48
49
50
51
52
53
54
55
56
57
58
59
60
61
62
63
64
65
66
67
68
69
70
71
72
73
74
75
76
77
78
79
80
81
82
83
84
85
86
87
88
89
90
91
92
93
94
95
96
97
98
99
100
101
102
103
104
105
106
107
108
109
110
111
112
113
114
115
116
117
import java.util.*;public class NestedIteratorNew implements Iterator <Integer > private static interface NestedInteger public boolean isInteger () public Integer getInteger () public List<NestedInteger> getList () } private static class NestedIntegerImpl implements NestedInteger private int num; private List<NestedInteger> list; private boolean isNum; public NestedIntegerImpl (int num) this .num = num; this .isNum = true ; } public NestedIntegerImpl (List<NestedInteger> list) this .list = list; this .isNum = false ; } @Override public boolean isInteger () return this .isNum; } @Override public Integer getInteger () return this .num; } @Override public List<NestedInteger> getList () return this .list; } } Deque<Iterator<NestedInteger>> stack; public NestedIteratorNew (List<NestedInteger> nestedList) this .stack = new LinkedList<>(); this .stack.addLast(nestedList.iterator()); } @Override public Integer next () if (hasNext()) { Iterator<NestedInteger> iterator = this .stack.peekLast(); NestedInteger i = iterator.next(); if (!i.isInteger()) { stack.addLast(i.getList().iterator()); return next(); } return i.getInteger(); } return null ; } @Override public boolean hasNext () if (this .stack.size() > 0 ) { Iterator<NestedInteger> top = this .stack.peekLast(); if (top.hasNext()) return true ; this .stack.removeLast(); return hasNext(); } return false ; } public static void main (String[] args) List<NestedInteger> test = new ArrayList<>(); test.add(new NestedIntegerImpl(new ArrayList<>())); NestedIteratorNew it = new NestedIteratorNew(test); while (it.hasNext()) { System.out.println(it.next()); } } }
空数组不返回的结果 由于上一个方法不能保证返回的时候,嵌套空数组返回 null。
所以,实际上只能在 hasNext() 调用的过程中去处理这种事情,保证每次从 stack 栈中获取的都是数字,不会存在 null 这种情况。
所以需要在 hasNext() 调用的过程中进行铺平操作,递归的调用,直到栈顶是一个带有数字的 iterator
1
2
3
4
5
6
7
8
9
10
11
12
13
14
15
16
17
18
19
20
21
22
23
24
25
26
27
28
29
30
31
32
33
34
35
36
37
38
39
40
41
42
43
44
45
46
47
48
49
50
51
52
53
54
55
56
57
58
59
60
61
62
63
64
65
66
67
68
69
70
71
72
73
74
75
76
77
78
79
80
81
82
83
84
85
86
87
88
import java.util.*;public class NestedIteratorNotReturnNull implements Iterator <Integer > private Deque<Iterator<NestedInteger>> stack; public NestedIteratorNotReturnNull (List<NestedInteger> nestedList) this .stack = new LinkedList<>(); this .stack.addLast(nestedList.iterator()); } @Override public boolean hasNext () while (!this .stack.isEmpty()) { Iterator<NestedInteger> top = this .stack.peekLast(); if (!top.hasNext()) { this .stack.removeLast(); continue ; } NestedInteger next = top.next(); if (next.isInteger()) { this .stack.addLast(Collections.singletonList(next).iterator()); return true ; } this .stack.addLast(next.getList().iterator()); } return false ; } @Override public Integer next () return stack.peekLast().next().getInteger(); } private static interface NestedInteger public boolean isInteger () public Integer getInteger () public List<NestedInteger> getList () } private static class NestedIntegerImpl implements NestedInteger private int num; private List<NestedInteger> list; private boolean isNum; public NestedIntegerImpl (int num) this .num = num; this .isNum = true ; } public NestedIntegerImpl (List<NestedInteger> list) this .list = list; this .isNum = false ; } @Override public boolean isInteger () return this .isNum; } @Override public Integer getInteger () return this .num; } @Override public List<NestedInteger> getList () return this .list; } } }
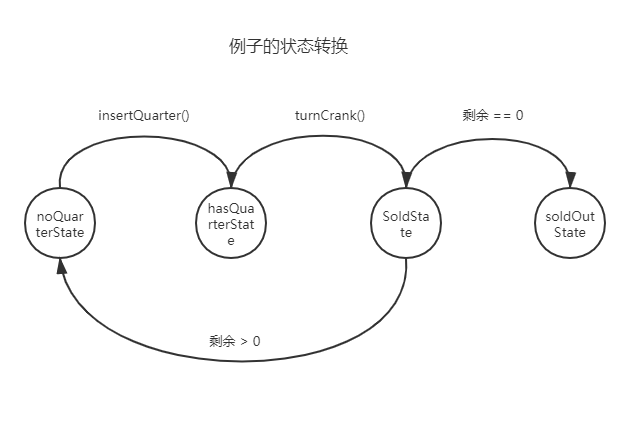
状态模式(状态机) 状态模式抽象状态操作,进行统一的调配,这样可以方便修改添加功能。因为这样才能满足对扩展开放,对修改关闭的效果。
以书上的例子为例,这个有以下几个状态及其转换关系
抽象 state 状态
1
2
3
4
5
6
7
8
9
10
11
12
package status;public interface State void insertQuarter () throws Exception void turnCrank () throws Exception void ejectQuarter () throws Exception void dispense () throws Exception }
实现各种状态
1
2
3
4
5
6
7
8
9
10
11
12
13
14
15
16
17
18
19
20
21
22
23
24
25
26
27
28
29
30
31
32
33
package status;public class HasQuarterState implements State private Context context; public HasQuarterState (Context context) this .context = context; } @Override public void insertQuarter () throws Exception throw new RuntimeException("无法重复投币" ); } @Override public void turnCrank () throws Exception this .context.setCurrentState(context.getSoldState()); } @Override public void ejectQuarter () throws Exception this .context.setCurrentState(context.getNoQuarterState()); } @Override public void dispense () throws Exception throw new RuntimeException("还未 turn crank 无法获取" ); } }
context 实现对于 state 的管理
1
2
3
4
5
6
7
8
9
10
11
12
13
14
15
16
17
18
19
20
21
22
23
24
25
26
27
28
29
30
31
32
33
34
35
36
37
38
39
40
41
42
43
44
45
46
47
48
49
50
51
52
53
54
55
56
57
58
59
60
61
62
63
64
65
66
67
68
69
70
71
72
73
74
75
76
77
78
79
80
81
82
83
84
85
86
87
88
89
90
91
92
93
94
95
package status;public class Context implements State private final State noQuarterState; private final State hasQuarterState; private final State soldOutState; private final State soldState; private State currentState; private int count; public Context (int count) this .count = count; this .hasQuarterState = new HasQuarterState(this ); this .noQuarterState = new NoQuarterState(this ); this .soldOutState = new SoldOutState(this ); this .soldState = new SoldState(this ); this .currentState = this .noQuarterState; } public void releaseCount () this .count--; } public int getCount () return count; } public void setCurrentState (State currentState) this .currentState = currentState; } public State getNoQuarterState () return noQuarterState; } public State getHasQuarterState () return hasQuarterState; } public State getSoldOutState () return soldOutState; } public State getSoldState () return soldState; } @Override public void insertQuarter () throws Exception this .currentState.insertQuarter(); } @Override public void turnCrank () throws Exception this .currentState.turnCrank(); } @Override public void ejectQuarter () throws Exception this .currentState.ejectQuarter(); } @Override public void dispense () throws Exception this .currentState.dispense(); } @Override public String toString () return "Context{" + "currentState=" + currentState + ", count=" + count + '}' ; } public static void main (String[] args) State c = new Context(5 ); try { c.insertQuarter(); c.turnCrank(); c.dispense(); System.out.println(c); c.insertQuarter(); c.ejectQuarter(); } catch (Exception e) { System.out.println(e.getMessage()); } } }
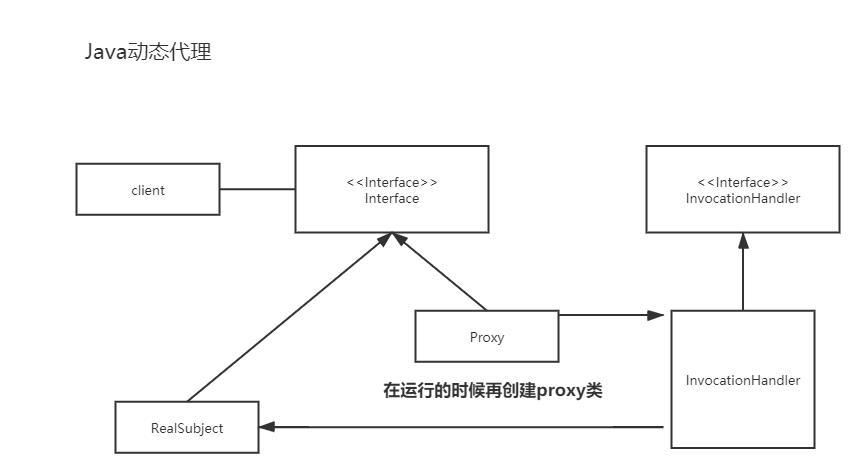
代理模式 代理模式也是对一个对象进行增强的模式,我理解的话。
通过持有真实的对象,向外暴露相同的方法,对数据进行动态增强。
java 动态代理 java 会在运行时创建代理类(返回生成类的 byte[] 并使用类加载器加载),通过继承 Proxy 类实现 Subject 接口的方式实现。具体可以参考下面的文章
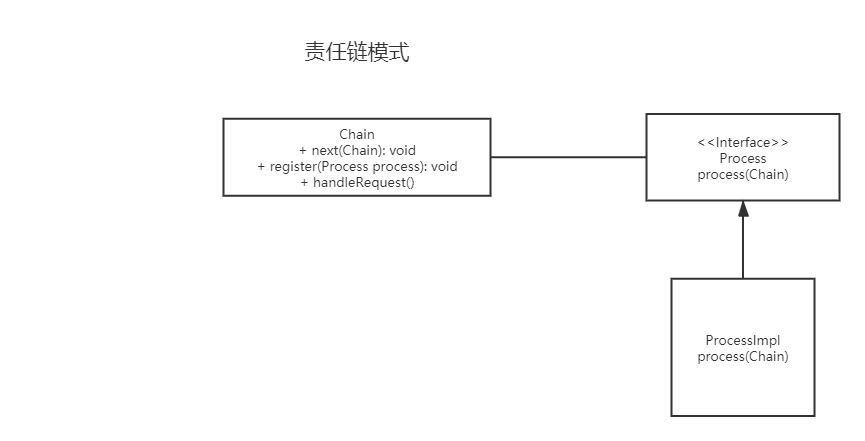
责任链模式 责任链设计模式是一种对链式调用更高级的抽象,能够把链式函数执行的控制权下放到链中间,在执行链的过程中,可以在调用下一个链式过程前和后处理进行额外的处理。java 中实现的主体逻辑也采用下面的方法实现。
主要分为两个部分
处理函数,即承担链式函数逻辑的实现
管理部分,即管理链调用过程的部分
1
2
3
4
5
6
7
8
9
10
11
12
13
14
15
16
17
18
19
20
21
22
23
24
25
26
27
28
29
30
31
32
33
34
35
36
37
38
39
40
41
42
43
44
45
46
47
48
49
50
51
52
53
54
package chain;@FunctionalInterface public interface Process void process (Chain c) } import java.util.ArrayList;import java.util.List;public class Chain List<Process> handlers; int index; public Chain () this .index = -1 ; this .handlers = new ArrayList<>(); } public void register (Process ...processes) this .handlers.addAll(Arrays.asList(processes)); } public void next () this .index++; while (this .index < this .handlers.size()) { this .handlers.get(this .index).process(this ); this .index++; } } public static void main (String[] args) Process p1 = (c) -> { System.out.println("first start" ); c.next(); System.out.println("first end" ); }; Process p2 = (c) -> { System.out.println("second start" ); c.next(); System.out.println("second end" ); }; Chain c = new Chain(); c.register(p1); c.register(p2); c.next(); } }
golang gin 中的链实现 gin
gin 也是使用责任链的方式来处理对某一个请求的链式调用的。可以通过如下的方法实现一个链式调用的过程。
1 2 3 4 5 router.GET("/example" , func (c *Context) }, func (context *Context) })
其中 Context 是一个被复用的上下文,保存 http 请求的 header、writer、body 等信息。在运行时被动态的添加对应的 handlerChain 到 context 中进行链式调用执行。
TODO:字符匹配的前缀树。goland 使用一个 radix 树来存储请求路径,每个 request method 会包含一个对应的 tree。
1 2 3 4 5 6 7 8 9 10 11 12 13 14 15 16 17 18 19 20 21 22 23 24 25 26 27 28 29 30 31 32 33 34 35 36 37 38 39 40 41 42 43 44 45 46 47 48 49 50 51 52 53 54 55 56 57 58 59 60 61 62 63 64 func (engine *Engine) handleHTTPRequest (c *Context) httpMethod := c.Request.Method rPath := c.Request.URL.Path unescape := false if engine.UseRawPath && len (c.Request.URL.RawPath) > 0 { rPath = c.Request.URL.RawPath unescape = engine.UnescapePathValues } if engine.RemoveExtraSlash { rPath = cleanPath(rPath) } t := engine.trees for i, tl := 0 , len (t); i < tl; i++ { if t[i].method != httpMethod { continue } root := t[i].root value := root.getValue(rPath, c.params, unescape) if value.params != nil { c.Params = *value.params } if value.handlers != nil { c.handlers = value.handlers c.fullPath = value.fullPath c.Next() c.writermem.WriteHeaderNow() return } if httpMethod != "CONNECT" && rPath != "/" { if value.tsr && engine.RedirectTrailingSlash { redirectTrailingSlash(c) return } if engine.RedirectFixedPath && redirectFixedPath(c, root, engine.RedirectFixedPath) { return } } break } if engine.HandleMethodNotAllowed { for _, tree := range engine.trees { if tree.method == httpMethod { continue } if value := tree.root.getValue(rPath, nil , unescape); value.handlers != nil { c.handlers = engine.allNoMethod serveError(c, http.StatusMethodNotAllowed, default405Body) return } } } c.handlers = engine.allNoRoute serveError(c, http.StatusNotFound, default404Body) }
所以其实,gin 中将表示和实际执行分为了两个部分
链的执行包含在 context 中,通过 context.next() 调用链的下一个方法
1
2
3
4
5
6
7
8
9
10
func (c *Context) Next () c.index++ for c.index < int8 (len (c.handlers)) { c.handlers[c.index](c) c.index++ } }
链自身的标识,由于链需要在调用的时候调用下一个方法,所以需要一个 context 的引用进行调用,golang 使用 type 给了对应的 chain alias,实际其就是一个 handlerFunc 的切片
1 2 3 4 5 type HandlersChain []HandlerFunc type HandlerFunc func (*Context)
链的注册,是通过 routerGroup 管理,每个 routerGroup 对应一个大链接下的小链接
1 2 3 4 5 6 7 8 9 10 11 12 13 14 15 16 17 18 19 20 21 22 23 24 25 26 27 28 29 30 31 32 33 34 35 func (group *RouterGroup) POST (relativePath string , handlers ...HandlerFunc) IRoutes return group.handle(http.MethodPost, relativePath, handlers) } func (group *RouterGroup) handle (httpMethod, relativePath string , handlers HandlersChain) IRoutes absolutePath := group.calculateAbsolutePath(relativePath) handlers = group.combineHandlers(handlers) group.engine.addRoute(httpMethod, absolutePath, handlers) return group.returnObj() } func (engine *Engine) addRoute (method, path string , handlers HandlersChain) assert1(path[0 ] == '/' , "path must begin with '/'" ) assert1(method != "" , "HTTP method can not be empty" ) assert1(len (handlers) > 0 , "there must be at least one handler" ) debugPrintRoute(method, path, handlers) root := engine.trees.get(method) if root == nil { root = new (node) root.fullPath = "/" engine.trees = append (engine.trees, methodTree{method: method, root: root}) } root.addRoute(path, handlers) if paramsCount := countParams(path); paramsCount > engine.maxParams { engine.maxParams = paramsCount } }
js koa 中的洋葱模型实现 js 的实现就简单很多了,koa 的实现可以参考 koa-compose
其本质思想与上面一个差不多,但是由于 js 支持闭包,也支持将 func bind 一个运行时,因此其在调用的时候,传递的是注册到 chain 中的下一个 function,所以直接执行即可。但是也因此,其必须要调用显示的 next() 方法。
1
2
3
4
5
6
7
8
9
10
11
12
13
14
15
16
17
18
19
20
21
22
23
24
25
26
27
28
29
30
31
32
33
34
function compose (middleware ) if (!Array .isArray(middleware)) throw new TypeError ('Middleware stack must be an array!' ) for (const fn of middleware) { if (typeof fn !== 'function' ) throw new TypeError ('Middleware must be composed of functions!' ) } return function (context, next ) let index = -1 return dispatch(0 ) function dispatch (i ) if (i <= index) return Promise .reject(new Error ('next() called multiple times' )) index = i let fn = middleware[i] if (i === middleware.length) fn = next if (!fn) return Promise .resolve() try { return Promise .resolve(fn(context, dispatch.bind(null , i + 1 ))); } catch (err) { return Promise .reject(err) } } } }
